 |
|
 |
|
|
| Message |
 Posted:
Mon Jun 09, 2008 10:22 am Post subject:
Smudge tutorial (for CG :P But everyone else can look too) Posted:
Mon Jun 09, 2008 10:22 am Post subject:
Smudge tutorial (for CG :P But everyone else can look too) |

|
|
Smudge tutorial by yours truly, Spam!
In this tutorial I'll be teaching you how to make a sort of grungy abstract sig by smudging. Just stick with me and it should turn out fine 
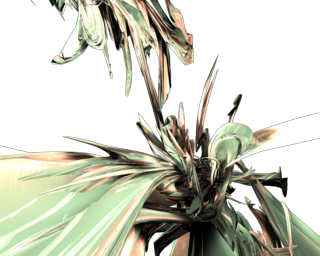
First things first--get a render. It works best with multi-colored C4Ds that have some contrast. I'll be using this (I would use it too so you can compare):

(Don't worry about the text, it won't show because of the placement.)
I'll be working on a 320x110 canvas. Make the background white, and then fill it with black. So now you have a 320x110 black box.
Now, the placement. Copy/paste the render into your sig. Move it so that it fills up about 3/4s of the sig, like so:

Doesn't have to be exactly like mine, but that is what I got. Anything close to that is fine.
Now, the smudging. Get out your smudge tool (press R--it also shares with the Blur and Sharpen tool, so make sure you have the SMUDGE tool selected. It's like a finger pointing). I picked a 36px Chalk brush to smudge, but it shouldn't really matter. Just go with that since that is what I use (lol). Make a new brush preset with these settings:
Shape Dynamics
*Size Jitter 100%
*Angle Jitter 100%
*Roundness Jitter 100%
*Minimum Roundness 25%
Scattering
*Scatter 155%
*Count: 3 or 4, not much of a difference. I use 4.
*Count Jitter 0%
Other Dynamics
*Strength Jitter 100%
Alright, so now we have our brush!
Before we start smudging, duplicate the render layer 3 times (I'll keep it simple for this tutorial). Hide all but the bottom layer.
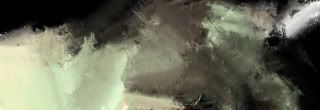
Now, with the bottom layer selected, START SMUDGING. Start near the edges, but not right on the edge, and click+drag out into the black areas. Be sure to smudge the whole render. Unhide the layer above it, and if you like it, great! I got this when I smudged:

Now, go to Filter>Sharpen>Sharpen. It should look better now.
Hide that smudged layer, and unhide the layer above it. Smudge that like you did the first layer. Looks good? Good. Filter>Sharpen>Sharpen this as well.
Now, unhide that first smudged layer. You should have both of your smudged layers showing now. Create a new layer above them, but under the 2 layers with the render. So, your layers pallet should look like so:
Render layer (hidden)
Render layer (hidden)
Blank layer (showing; you just created this one)
Smudged layer (showing)
Smudged layer (showing)
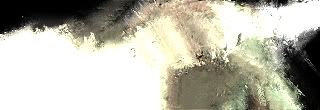
Now, make sure the smudged layers are set to "Normal" as their layer setting. Select the blank layer and go to Image>Apply Image. Put this layer setting to whatever looks good--for me, it looked best as linear dodge, but screen, soft light, and overlay also looked good. This is what I have now:

Sorta blinding, right? Well, unhide the bottom render layer. Not so blinding anymore, eh?
Alright now, take out the brush you made earlier, but change it to 10px. 8px also works too. Hide everything except that render layer. Then, smudge just the edges. It should look sorta like smoke is coming off the render. I got this:

Done? Good. Hide that layer, and do the same with the top render layer. Now, set everything so that it is showing, and set the top render layer to "Multiply" for the layer setting. Looking sorta good now? This is what I have so far:

If you're pleased with your result, then you can say you're done. However, I'm going to do a few more steps, sorta as touch-ups.
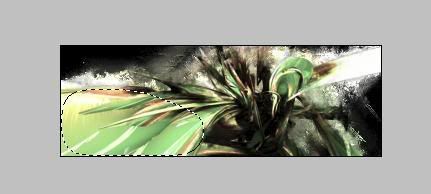
Optional, but recommended, steps: Select your lasso tool and set it to about feather 13px. Select an area like so:

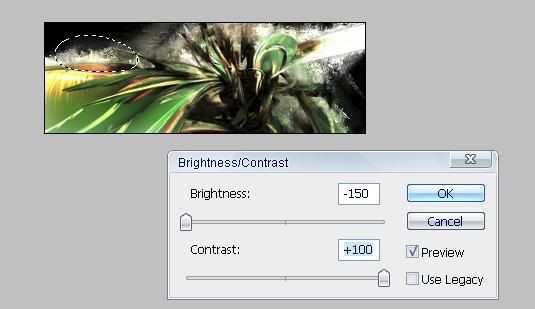
Now, go to Image>Adjustments>Brightness/Contrast. Set the Brightness to -150 and the Contrast to +100. It should darken it up to look sorta like this:

Hmm, that white there on the left is sorta bothering me. I'll fix that. Select the 3rd layer (the one that you did Image>Apply Image to, and set it to Linear Dodge or one of my other recommendations). Make a selection like so, then go to Image>Adjustments>Brightness/Contrast and use these settings:

Looks good now? Good! (If it doesn't you could do the same thing again. Should fix it then.)
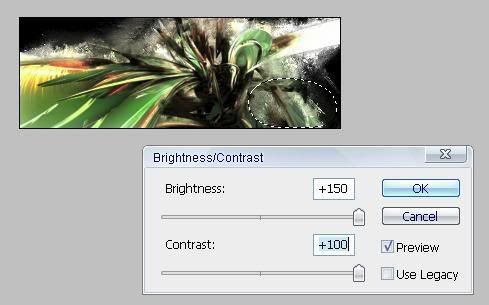
That bottom right is too dark for my liking, so I'll lighten it up. Do like so if you'd like:

(Of course, I used Image>Adjustments>Brightness/Contrast on this.)
I'm thinking it is done now. Add a layer on top of everything to make a border (Ctrl+Shift+N to create a new layer). Press Ctrl+A to select everything, then go to Edit>Stroke. A 1px black border will do fine.
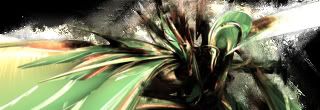
Now, add some text. I think the best placement is in the top left. Put it so that the bottom half (and a some of the top half) is on the last part with color--Right where the white part is. Pick a color that will go with the sig, like green. Add a drop shadow and put the layer setting to Soft Light, Screen, or Linear Dodge. I picked Screen since I thought it looked the best. I got this:

Note: You could also put the text in the bottom right.
Note: Text placement is very hard for this particular signature, so if you get anything that you think is half good, then it is good enough 
That's what I got in this particular tutorial. If you look at my current sig, you'll see that it looks much better...But it cost be about an hour to get it to look like it does, and I wanted to keep this tutorial short, so I didn't go into doing all that. I can upload the .PSD of this tutorial sig or of my actual sig if anyone needs a visual.
Thanks for reading   
_________________

|
|
|
|
 |
|
 |
|
 |
 |
|
 |
|
|
| Message |
 Posted:
Mon Jun 09, 2008 2:37 pm Post subject: Posted:
Mon Jun 09, 2008 2:37 pm Post subject:
|

|
|
Thank you so much for putting this together. Great job.
I will definately give it a try.
Thanks again, much appreciated.

_________________


|
|
|
|
 |
|
|
|
| Message |
 Posted:
Mon Jun 09, 2008 2:42 pm Post subject: Posted:
Mon Jun 09, 2008 2:42 pm Post subject:
|

|
|
| {uZa}Canadian Girl wrote: | Thank you so much for putting this together. Great job.
I will definately give it a try.
Thanks again, much appreciated.
 |
No problem at all! Mine turned out bad for the tutorial, but I was also sorta rushing it, so I could have probably done a better job. My current sig proves it 
I'm glad it at least sparked someone's interest 
_________________

|
|
|
|
 |
|
|
|
| Message |
 Posted:
Tue Jun 10, 2008 3:05 pm Post subject: Posted:
Tue Jun 10, 2008 3:05 pm Post subject:
|

|
|
Nice presentation. The Smudge tool might also work for CG's rendering hair problem. The softly focus hair looks real.
_________________
The lottery is a tax on people who are bad at math.
|
|
|
|
 |
|
|
|
| Message |
 Posted:
Tue Jun 10, 2008 4:13 pm Post subject: Posted:
Tue Jun 10, 2008 4:13 pm Post subject:
|

|
|
| fate wrote: | | Nice presentation. The Smudge tool might also work for CG's rendering hair problem. The softly focus hair looks real. |
She would be better off using the Blur tool, because the Smudge tool has a habit of destroying hair.
_________________

|
|
|
|
 |
|
|
|
| Message |
 Posted:
Wed Jun 11, 2008 7:32 pm Post subject: Posted:
Wed Jun 11, 2008 7:32 pm Post subject:
|

|
|
ok....I have never made a new brush preset before..... 
I am working on it Spam. 
_________________


|
|
|
|
 |
|
|
|
| Message |
 Posted:
Wed Jun 11, 2008 7:40 pm Post subject: Posted:
Wed Jun 11, 2008 7:40 pm Post subject:
|

|
|
| {uZa}Canadian Girl wrote: | ok....I have never made a new brush preset before..... 
I am working on it Spam.  |
Alright 
To make a brush preset, first select the style and size brush you want--in this case, the 36px Chalk brush. Then go to Window>Brushes (or press F5). Then you'll get the window with all the things I had for the settings.
_________________

|
|
|
|
 |
|
 |
|
 |
 |
|
 |
|
|
| Message |
 Posted:
Wed Jun 11, 2008 9:36 pm Post subject: Posted:
Wed Jun 11, 2008 9:36 pm Post subject:
|

|
|
| Spamitarium wrote: | | {uZa}Canadian Girl wrote: | ok....I have never made a new brush preset before..... 
I am working on it Spam.  |
Alright 
To make a brush preset, first select the style and size brush you want--in this case, the 36px Chalk brush. Then go to Window>Brushes (or press F5). Then you'll get the window with all the things I had for the settings. |
Thank you!!! You are making me try new things on this one.  I enjoy it though... I enjoy it though...
Sooooo....much to learn.. 
Last edited by {uZa}Canadian Girl on Fri Jun 13, 2008 6:51 pm; edited 1 time in total |
|
|
|
 |
|
 |
|
 |
 |
|
 |
|
|
| Message |
 Posted:
Thu Jun 12, 2008 9:58 am Post subject: Posted:
Thu Jun 12, 2008 9:58 am Post subject:
|

|
|
| {uZa}Canadian Girl wrote: | | Spamitarium wrote: | | {uZa}Canadian Girl wrote: | ok....I have never made a new brush preset before..... 
I am working on it Spam.  |
Alright 
To make a brush preset, first select the style and size brush you want--in this case, the 36px Chalk brush. Then go to Window>Brushes (or press F5). Then you'll get the window with all the things I had for the settings. |
Thank you!!! You are making me try new things on this one.  I enjoy it though...more fun making your own sig. I enjoy it though...more fun making your own sig. 
Sooooo....much to learn..  |
No problem 
I'm going to try a new style of smudging, but with a render, and if I like how that comes out, I might post a tutorial on how to make it too. 
_________________

|
|
|
|
 |
|
 |
|
 |
|
You cannot post new topics in this forum
You cannot reply to topics in this forum
You cannot edit your posts in this forum
You cannot delete your posts in this forum
You cannot vote in polls in this forum
|
|


